Preparing Windows Server, setting up Service Account, configuring Windows Server & Installing the required roles & features for setting up itrezzo UCM for the first time
By: Harpreet Singh Wasu
Now that you have gone through the prerequisites for itrezzo UCM and are ready to install and configure it for the first time, this new series of blogs will help you to configure the itrezzo UCM with Step-By-Step instructions and guide you what all components need to configured initially to get you going and perform your first sync of contacts.
Let's begin our post without wasting any more time. Please follow me through the below mentioned steps:
Note: We will be performing all these steps on the Server (VM or Physical) that has been setup to run itrezzo UCM.

STEP II - Next step is to set the service account to login as a service.
Now that you have gone through the prerequisites for itrezzo UCM and are ready to install and configure it for the first time, this new series of blogs will help you to configure the itrezzo UCM with Step-By-Step instructions and guide you what all components need to configured initially to get you going and perform your first sync of contacts.
Let's begin our post without wasting any more time. Please follow me through the below mentioned steps:
Note: We will be performing all these steps on the Server (VM or Physical) that has been setup to run itrezzo UCM.
Preparing a new Windows Server 2012 R2 for itrezzo Unified Contact Management
There are two things to be done on the Server before running the installation file:
STEP I - Sign-in to the member server that you will be using for itrezzo
using a Domain Admin or Enterprise Admin credentials.
- Open Server Manager > Tools > Computer Management.
- Expand Local Users and Groups from the left navigation pane and click on Groups.
- Double-Click on the Administrators Group > Click Add.
- Type the name of the new Service account > Check Names > OK > Apply > OK

STEP II - Next step is to set the service account to login as a service.
- Open Run prompt using Windows + R key on your keyboard.
- Type secpol.msc to open Local Security Policy MMC console.

- Expand Local Policies > Select Users Rights Assignment.

- Under list of Policies, double click on Log on as a service.
- Click Add User or Group > Type the name of itrezzo Service Account > Check Names > OK.
- Apply > OK.

- Log Off from the server and login again as the itrezzo Service Account.


Configuring Windows Server 2012 R2 for itrezzo Unified Contact Management
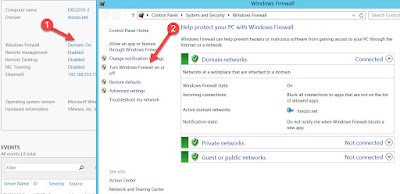
- Open Server Manager and Select Local Server from left navigation pane.
- Turn Off Windows Firewall - Select Windows Firewall > Turn Windows Firewall On or Off >
Turn off Domain, Private and Public Network Settings > OK

- Turn off the IE Enhanced Security Configuration from Server
Manager.


Installing the required Roles and Features for itrezzo Server
- Open Server Manager > Manage > Add Roles and Features.

- Click Next on the first begin installation Window.

- Select Role-based or feature-based installation > Next.

- In the Select destination server window, select
the server on which you are going to install itrezzo UCM > Next.

- From the Select server roles window, Check mark Web
Server (IIS) > Add Features > Next.

- In the Select features window, expand NET Framework 4.5
Features and check mark ASP.NET 4.5. Also expand WCF Services and check
mark HTTP Activation, TCP Activation & TCP Port Sharing > Add all these
features > Next.

- In the Web Server Role (IIS) window, hit Next.

- In the Select role services window, scroll down and expand Security & the only feature that
should be checked here is Windows Authentication because that’s what itrezzo
use.

- On the same page, expand Application Development & make sure ASP.NET 4.5 & .NET Extensibility 4.5 are checked. Hit Next after verifying the same. Note: itrezzo
UCM can run with ASP.NET 4.5 or higher.

- In the Confirm installation sections, review your selections and click on Install.
- Once all the required roles and features are installed, open IE from the itrezzo server and choose Don’t use
recommended settings.

- Navigate to http://support1.itrezzo.com/updates/Server/ from the address bar.

- You will find the latest build of itrezzo UCM on this page with an .exe extension to download.
- Right-click on the .exe file and choose Save target as and
save the setup file to your desired location on the server.

- While the .exe file is getting downloaded, click on Utility on the same page> 3rd > Right-click on Tail.exe & save it to the desktop.
This tool is useful as it tails off the log as we can drop off a log file on it and
monitor as the system is starting up or as it’s updating a mailbox.


Now that you have successfully setup your server for itrezzo UCM installation and configuration and downloaded the required software, let's have a look on how to install and configure the itrezzo UCM in out next part - Step-By-Step: Setting up itrezzo UCM - Part - II. The next part with cover the installation and configuration of itrezzo UCM for the first time use.
This is the Part-1 of the Step-by-Step series on how to setup itrezzo UCM for the first time.
To check other blogs of this series, follow the below links:
No comments:
Post a Comment