Tuesday, March 5, 2019

Step-By-Step: Setting up itrezzo UCM - Part - 4

Choosing the target folder for synced contacts, licensing users in itrezzo UCM & creating a Schedule Sync Task.

By: Harpreet Singh Wasu

This is the Part-4 of the Step-by-Step series on how to setup itrezzo UCM for the first time.
To check previous blogs of this series, follow the below links:

  1. Step-By-Step: Setting up itrezzo UCM - Part - I
  2. Step-By-Step: Setting up itrezzo UCM - Part - 2
  3. Step-By-Step: Setting up itrezzo UCM - Part - 3

Choosing target folder in Outlook where the contacts will get pushed


  1. Open itrezzo Web Admin > expand Unified Contact Manager (UCM) on the left navigation pane.
  2. Click on Configuration > select Sync Options tab.
  3. This is where you have to decide where you want to put the Contact List in a sub-folder or whether you want to put it in the default contacts folder.
  4. To put the new Contact List in a sub-folder, check mark the option Put Mandatory Contacts in Sub Folder & click on Set sub-folder name to give a name to the target sub-folder. If you do not specify a custom name, by default it will give the name itrezzo MCL.
  5. In order to prevent creation of duplicates, choose Move existing contacts to  Always from the drop down next to it. So, if it finds a contact that matches from the GAL in your default Contacts folder, it is going to grab that contact and put it in the sub-folder and start managing it from now and will update it with current information.
  6. The next important box to check is Remove Obsolete Mandatory Contacts. So, if one of the synced contacts disappears from GAL or you remove it – for example if a employee has left the organization, and you want that contact to get deleted automatically from the targeted users, then keep this option checked or else leave it unchecked if you want the deleted contact to still appear in the mailbox of targeted users.
  7. In the Contacts Notes option, choose either Use Most trusted Source or Never write to this field.
  8. Use most trusted source means if there is a note in the contact in Active Directory or any of the Alternate Contact Sources (ACS)  like in the PF, then it will push that Note along with the Contact.
  9. In the File As Rule, you can choose how your contacts should appear, First name, Last Name or Last Name, First name. The default value is Never overwrite existing value.
  10. The next option to check is Update custom contacts unless you have a Custom Contact List.
  11. Also deselect the option of Send notification of all contact updates if you do not wish to receive notifications at every sync. After this keep the other settings as default & click Save.


License target user mailboxes in itrezzo Web Admin to receive required contacts


  1. After this step, the next step is to License the Target Users. Itrezzo UCM pushes contacts only to licensed users within itrezzo UCM. To make sure the target users are licensed, please follow the below steps:
  2. Expand Unified Contact Manager from the left navigation pane > User Statistics. You can also click on the User Statistics icon at the top right corner in the green bar.
  3. Select User Enablement, fifth icon from the top right in the grey bar.
  4. Check mark the box for Automatically add users to the license packs > Click Manage > Choose Collections > Add GAL Targets > Save.
  5. Check mark the option Remove users who are not members of the DL’s.
  6. Also check mark the option Remove disabled accounts from license > Save


  • Now, itrezzo UCM will perform a license check and a pop up at the bottom right of the taskbar will show the progress.
  • Once the licenses are updated & applied, you will see the Active status on license in the User Statistics window. The Last updated column specifies when the mailbox was updated last. The Exchange column shows which Exchange Server you are on.


Turn off EPS backups and enabled UCM backups


  1. The next step is to turn off EPS Backups & enable UCM backups. The UCM backups uses the MongoDB database that is built-in within itrezzo UCM. Perform the below steps:
  2. Go to  UCM > Configuration
  3. Select the Backup Options tab on the top.
  4. Set the option of Limit attachment to contacts per item to 0 &  Purge items older than to days.
  5. Check mark the option of UCM backups & click on Configure.
  6. Select Monthly from radio button & you can choose the date of your choice – in our example First of every month > Click on Save.
  7. This will Purge items older that whatever number of days you choose to, for example 30 days.


The contacts are backed up in the MongoDB database which is built-in within the itrezoo UCM itself.

Run a manual sync on one target user mailbox for testing the configuration

To begin our testing on one target user for demo purpose, we are now going to run a manual sync on one target user. 

  1. From the User Statistics window, right click on the target user mailbox and choose Run UCM Now. It will run all the default settings on this target mailbox only. You can track the progress from the bottom right corner.


  • It is very important that the target user must be licenses because the first task itrezzo UCM does in the background is that it caches all the Source and Target information within itself, then it updates the Collections and finally it updates the Licensed users.
  • Also, as the target mailbox starts getting updated,  a log file with the name of the target user will get created in C:\Windows\Program Files(x86)\itrezzoAgent\Logs\Day_of_the_Week\. 
  • You can drag the log file to the Tail icon on the desktop to see how the target user(s) are getting updated.
  • Once itrezzo UCM finishes updating target user mailbox, you can see the columns in main screen of User Statistics will have value populated like MCL – 21, CCL – 0, Elapsed  - 87 (which means it took 87 seconds), Age – 18 ( meaning DDC was 18 seconds old). Once you verify that the test sync worked as expected, you can move on to the last step, which is creating a Schedule Sync task.


Setting up a Schedule Sync task in itrezzo UCM


The last thing which is required for setting up itrezzo UCM for the first time & this demo step-by -step setup is to setup a Schedule Task to run automatically.
  1. Go to UCM > Schedule & Custom Tasks > Click on the + sign on the top right corner.
  2. In the Advanced Schedule window, choose Daily & choose different times like 4 AM, 7 PM as an example.
  3. From the drop down, choose GAL Targets.
  4. Check mark the following options: Data Dictionary Age with default valuesCollection age with default valuesAuto-license age – with default valuesMandatory Contacts ListsContact photos.
  5. Once you are done selecting all the above options, hit Save.


  • After saving the settings, a new Schedule Task will get created and will appear under the Schedule & Custom Tasks window. Now, anytime you would want to run a manual sync task on the users who are members of the GAL Targets, navigate to this page and right click on the created task and choose Run Now.
  • If you want to run a manual sync on a particular target user mailbox, you will need to do it from the User Statistics window just as we did ran a manual sync for a test user above. In case you want to run a manual sync on all user mailboxes which are members of the GAL Targets, then you need to run  a manual sync from Schedule & Custom Tasks window.


This completes all the necessary steps required to configure itrezzo UCM for you. I hope you find this series of blog post helpful and easy to follow. 

In case you have any feedback or suggestions for us, do write  us in the comments below or if you require any further assistance, feel free to reach out to the support team and we will always be there to assist you and answer all of your queries.

Step-By-Step: Setting up itrezzo UCM - Part - 3

Configuring itrezzo UCM - Part-1 -Running License Checks, creating a Collection in itrezzo UCM and setting up a Mandatory Contact List (MCL) in itrezzo UCM

By: Harpreet Singh Wasu


This is the Part-3 of the Step-by-Step series on how to setup itrezzo UCM for the first time.
To check other blogs of this series, follow the below links:
  1. Step-By-Step: Setting up itrezzo UCM - Part - I
  2. Step-By-Step: Setting up itrezzo UCM - Part - 2
  3. Step-By-Step: Setting up itrezzo UCM - Part - 4

The first-time you run the itrezzo Web Administrator, you will see a new wizard to follow. We would recommend to close that by clicking on Cancel and recommend you to follow the below steps:


At the bottom right corner of the Web Administrator, you will be able to identify the service account and the target service mailbox.


Running Licensing checks on itrezzo UCM to make sure your purchased licenses appear in UCM


  • Expand Global Configuration on the left navigation pane > License Packs > Tablet & gear icon at the top right corner to Run License checks. 


Note: When you initiate a licensing check, itrezzo UCM at the back-end will check for the license attachment file in the email that you forwarded. itrezzo UCM will convert the same licensing attachment file into a license pack after you forward the email as instructed before.

Create a Collection in itrezzo UCM


The next steps now is to create a Collection.

  1. Click on Collections icon at the top right corner in green bar or expand Data Dictionary on the left navigation pane & click on Collections.
  2. Click on the plus (+) sign at the top right corner to Add a new collection.
  3. Give a name to the collection in the Collection Name box. For example – GAL Source.There are different options available for selecting the source like users, distribution lists, another Collection, Dynamic Distribution lists, an OU, LDAP Query, etc. In our example, we will click on Group icon on the left and choose a DL that contains all the users – e.g. “DL All Itrezzo”.
  4. You can drag the user or group to the right in the Inclusion List box or click on the Green arrow to put the selected source in the Inclusion List & click on Save.
  5. After selecting a source, you need some targets. So, you need to create one more collection for Targets & you can name them GAL Targets or Smartphone Users. Add a user mailbox for example your own mailbox or any other test mailbox in the Inclusion List in the GAL Targets collection & hit Save.

Creating & setting up Mandatory Contact List


After creating the Source & Target collections, the next thing to setup is a Mandatory Contact List.

So what is a Mandatory Contact List ?


  • Mandatory Contact List (MCL) is a contact list that pulls all the information (attributes) from the source contacts (for example - Public Folder or GAL) and merges that information with the Active Directory by matching the users based on their primary email address (SMTP address) and then this contact list is then pushed to the target user mailboxes.
  • So, if you were using a Public Folder contact list for your MCL source (using Alternate Contact Sources -ACS in UCM) and there were fields in the PF source that did not have data in them (like Business Address Street), then UCM would look up that user in AD using the SMTP address and if the Business Address Street had data (value) in AD, it would merge or combine that information to create a contact to be pushed out to target user mailboxes during the UCM sync pass.
  • In Simple words, Mandatory Contact List takes whatever the source is and merge it with whatever contacts are in the Active Directory or in the GAL. It matches them all and puts them into one single contact.
  • Mandatory Contact List always uses AD as source to merge a contact with. Also the first source as under Alternate Contact Sources like Public Folder or Shared mailbox will always take precedence than whatever is there in Active Directory.
  • If you want to check the precedence then from itrezzo Web Admin, expand Data Dictionary from left navigation pane > expand Alternate Contact Source.
  • The below list will show the order in which they are trusted. Whatever comes first, takes more precedence.
  • For Example: The sources above the AD which were the Alternate Contact Sources, for e.g. PF, whatever is in that takes precedence over what is there in AD.

Follow the below steps to create a Mandatory Contact List (MCL):


  1. To create a Mandatory Contact List, click on Mandatory Contact List icon on top green bar or expand Unified Contact Manager on the left navigation & click on Mandatory Contact List > click on the + (plus) sign at the top right corner.
  2. Choose a Name for the Mandatory Contact List (MCL).
  3. Select the source from Source: Mandatory Contacts box by clicking on Select icon & click the Folder icon to see the Collections, select GAL Source > click Save.
  4. Check the box for Include contacts with no email address if you like to include contacts that do not contain any email address.
  5. Also, if there exists any Distribution Lists in the Collection & you want to push out the SMTP address for it as a contact, then check mark the box Include DL’s as mandatory Contacts. So, if there is a Distribution List in there, for e.g All Itrezzo Users which has a SMTP address, that will be pushed as a Mandatory Contact so that the user will be able to email to that Distribution List from there phone. Normally you don’t see the Distribution List on the phone and  this is not supported by Outlook as well.
  6. We can also populate the Autocomplete list in Outlook. Check Populate Autocomplete list with members of the listEvery time itrezzo runs and it updates contacts, they get cleared out of the autocomplete list. So this feature will help you to keep the autocomplete list up to date.
  7. After adding the source in MCL, select target from the Target: Authorized Recipients box by clicking on Select icon and selecting Folder icon for collections > GAL Targets > Save.
  8. By following the above steps a Mandatory Contact List will get created based on the Source and Target provided. If you want to update the MCL, click on the refresh icon on the right on the grey bar. You can see the contents of the MCL by expanding Unified Contact Manager > expand Mandatory Contact Lists & select the MCL for which you want to view the contents. All the contacts from that MCL will appear in the window at the center of itrezzo Web Admin.

With this, we have completed the first three main steps for getting started with itrezzo.

Click on the below articles to move to follow along with the next set of steps from Part-4 of this series:

Monday, March 4, 2019

Step-By-Step: Setting up itrezzo UCM - Part - 2

Installing itrezzo UCM, setting up service account mailbox for itrezzo UCM and registering license packs

By: Harpreet Singh Wasu

This is the Part-2 of the Step-by-Step series on how to setup itrezzo UCM for the first time.
To check other blogs of this series, follow the below links:
  1. Step-By-Step: Setting up itrezzo UCM - Part - I
  2. Step-By-Step: Setting up itrezzo UCM - Part - 3
  3. Step-By-Step: Setting up itrezzo UCM - Part - 4
After you have completed all the steps from Setting up itrezzo UCM - Part-I of this series, it is time to start the installation and initial configuration of itrezzo UCM.

Installing itrezzo UCM


  1. Once the itrezzo UCM software is downloaded, navigate to the folder where you saved the installer and double-click on the .exe file & select Run on the new prompt.
  2. In the itrezzoAgent Setup wizard, click on Install & select Yes if prompted from User account control permissions.
  3. Click Next on the Welcome window of the setup.
  4. Accept the licence terms & click Next.
  5. Choose the default path for the installation which is suitable in most cases unless you want to specify a different installation path of your own choice.
  6. In the Custom Setup (features selection) window, keep the default options checked & click Next.
  7. When you enter the password for the service account on this screen, a NETBIOS Logon is performed and credentials are verified from the Active Directory. If the NETBIOS Logon is unable to find the account or verify the credentials, then check mark the option to Skip Domain Authentication, provide the credentials & click Next.
  8. In the Ready to Install itrezzoAgent window, keep the default option checked to Launch the Setup Wizard after installation . Keep this option checked if you are installing the itrezzoAgent for the first time. Select Install. itrezzoAgent will also install the Silverlight and itrezzo Web Admin automatically during the installation.
  9. Once the installation is complete, click on Finish.
  10. Click on Close when you get the installation is successful message on the screen.

Initial configuration - setting up service account mailbox for iterezzo UCM & requesting License packs 


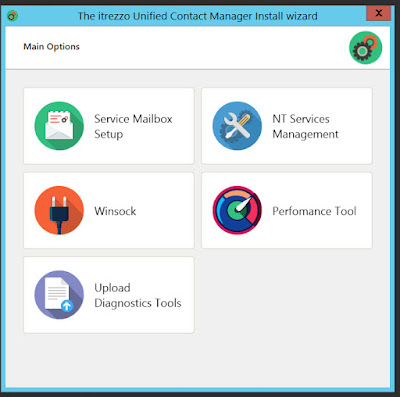
Once the installation is complete, you will the below start up wizard.


Setting up service account mailbox


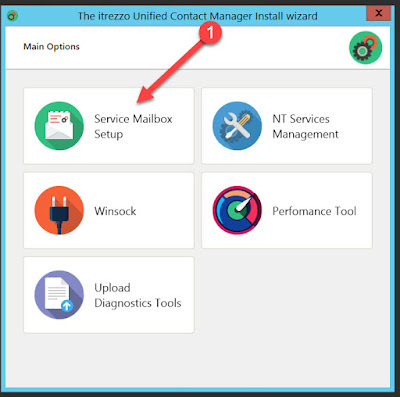
  1. Now to setup itrezzoAgent, the first thing you have to do is do choose the Service Mailbox Setup from the itrezzo UCM install wizard. Click on Service Mailbox Setup tile. This is where itrezzo UCM writes the structures into the Service Account mailbox that you created earlier in the prerequisitesarticle. This option has the ability to perform the licensing by interacting with our licensing database. Use the Service Account that was created from the prerequisites article on this screen.
  2. Select Exchange for On-Premise Exchange.
  3. Uncheck the box for Override default.
  4. Access Type – Use Default Access.
  5. Choose the correct Exchange Server version from the drop down next to Version.
  6. Check mark the box for Direct URL and enter the internal address of the Exchange Server or the URL to access OWA internally because that is where the EWS stub is located & then click on Validate.
  7. Once the validation is succeeded, click OK & click Next.
  8. In the Contact info window, enter a few characters of your service account mailbox and using GAL lookup you will find the service mailbox in the drop down, select the appropriate service account.
  9. The Email Address box contains the email of the contact person where we send information about the updates and billing. We recommend putting an email address of a user mailbox instead of a Distribution Group or a Shared Mailbox.
  10. We have an algorithm that generates an Authorization code based on the Service Account email, user email and version installed on the machine. Click on Get to get a new Authorization code. It is very important to get an authorization code as you will not be able to do anything without it. Once you have the code displayed, click on Next. It will save the details on the mailbox.
  11. Once you click on Get to acquire an authorization code, we get an email from the licensing server that someone registered for a new authorization code. 
  12. Click on Next & we are going to get another email.
  13. You will always get two emails. The first one with subject: itrezzo UCM Registration Succeeded & the other email with subject: Request License Pack. The second email contains the details of the contact person, the authorization code and the version that you install. Make sure to check the contact details and make sure the email should not be reflecting any of your personal domains like gmail or yahoo, it should only be of your Exchange organization’s email, where you are installing itrezzo  UCM.
  14. Make sure Start all services and Launch Web Administrator options are checked and once verified, click Finish.
Note: For itrezzo UCM, we provide you free licenses for 10 users which you can use as trial and these are fully functional licenses which are good to use for one year.

  • After, we activate the trail licenses for you from back-end, you will receive an email with the instructions on how to activate the license pack. The email with contain an attachment but you do not need to save the attachment from the email. .
  • To install this license pack, please forward the email message without any modification to the email address of the itrezzoAgent service account mailbox.
  • From the itrezzo Web Admin navigate to the Global Configuration > License Packs container and click on the small tablet and gear icon on the grey bar on the upper right. 
  • Your new license pack should appear in the grid within a minute or two. 
  • The current version of your itrezzoAgent UCM server is shown at the bottom of the Web Admin in the green bar.

Let's move with our next post of this Step-By-Step series. With Part-3 of this series, you learn how to configure the other options to setup a first sync of contacts to your target user mailboxes.

Click on the below articles to move to follow along with the next set of steps from Part-3 & Part-4 of this series:
  1. Step-By-Step: Setting up itrezzo UCM - Part - 3
  2. Step-By-Step: Setting up itrezzo UCM - Part - 4

Step-By-Step: Setting up itrezzo UCM - Part - 1

Preparing Windows Server, setting up Service Account, configuring Windows Server & Installing the required roles & features for setting up itrezzo UCM for the first time

By: Harpreet Singh Wasu

Now that you have gone through the prerequisites for itrezzo UCM and are ready to install and configure it for the first time, this new series of blogs will help you to configure the itrezzo UCM with Step-By-Step instructions and guide you what all components need to configured initially to get you going and perform your first sync of contacts.

Let's begin our post without wasting any more time. Please follow me through the below mentioned steps:

Note: We will be performing all these steps on the Server (VM or Physical) that has been setup to run itrezzo UCM.


Preparing a new Windows Server 2012 R2 for itrezzo Unified Contact Management


There are two things to be done on the Server before running the installation file:


STEP I - Sign-in to the member server that you will be using for itrezzo using a Domain Admin or Enterprise Admin credentials.

  1. Open Server Manager > Tools > Computer Management.
  2. Expand Local Users and Groups from the left navigation pane and click on Groups.
  3. Double-Click on the Administrators Group > Click Add.
  4. Type the name of the new Service account > Check Names > OK > Apply > OK


STEP II - Next step is to set the service account to login as a service.

  1. Open Run prompt using Windows + R key on your keyboard.
  2. Type secpol.msc to open Local Security Policy MMC console.
  3. Expand Local Policies > Select Users Rights Assignment.
  4. Under list of Policies, double click on Log on as a service.
  5. Click Add User or Group > Type the name of itrezzo Service Account > Check Names > OK.
  6. Apply > OK.
  7. Log Off from the server and login again as the itrezzo Service Account.

Configuring Windows Server 2012 R2 for itrezzo Unified Contact Management


  1. Open Server Manager and Select Local Server from left navigation pane.
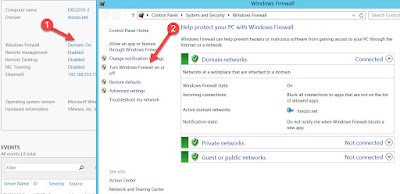
  2. Turn Off Windows Firewall - Select Windows Firewall >  Turn Windows Firewall On or Off  > Turn off Domain, Private and Public Network Settings > OK
  3. Turn off the IE Enhanced Security Configuration from Server Manager.


Installing the required Roles and Features for itrezzo Server


  1. Open Server Manager > Manage > Add Roles and Features.
  2. Click Next on the first begin installation Window.
  3. Select Role-based or feature-based installation > Next.
  4. In the Select destination server window, select the server on which you are going to install itrezzo UCM > Next.
  5. From the Select server roles window, Check mark Web Server (IIS) > Add Features > Next.
  6. In the Select features window, expand NET Framework 4.5 Features and check mark ASP.NET 4.5. Also expand WCF Services and check mark HTTP Activation, TCP Activation & TCP Port Sharing > Add all these features > Next.
  7. In the Web Server Role (IIS) window, hit Next.
  8. In the Select role services window, scroll down and expand Security & the only feature that should be checked here is Windows Authentication because that’s what itrezzo use.
  9. On the same page, expand Application Development & make sure ASP.NET 4.5 & .NET Extensibility 4.5 are checked. Hit Next after verifying the same. Note: itrezzo UCM can run with ASP.NET 4.5 or higher.
  10. In the Confirm installation sections, review your selections and click on Install.
  11. Once all the required roles and features are installed, open IE from the itrezzo server and choose Don’t use recommended settings.
  12. Navigate to http://support1.itrezzo.com/updates/Server/ from the address bar.
  13. You will find the latest build of itrezzo UCM on this page with an .exe extension to download.
  14. Right-click on the .exe file and choose Save target as and save the setup file to your desired location on the server.
  15. While the .exe file is getting downloaded, click on Utility on the same page> 3rd > Right-click on Tail.exe & save it to the desktop. This tool is useful as it tails off the log as we can drop off a log file on it and monitor as the system is starting up or as it’s updating a mailbox.

Now that you have successfully setup your server for itrezzo UCM installation and configuration and downloaded the required software, let's have a look on how to install and configure the itrezzo UCM in out next part - Step-By-Step: Setting up itrezzo UCM - Part - II. The next part with cover the installation and configuration of itrezzo UCM for the first time use.

This is the Part-1 of the Step-by-Step series on how to setup itrezzo UCM for the first time.
To check other blogs of this series, follow the below links:
  1. Step-By-Step: Setting up itrezzo UCM - Part - 2
  2. Step-By-Step: Setting up itrezzo UCM - Part - 3
  3. Step-By-Step: Setting up itrezzo UCM - Part - 4