Monday, December 17, 2018

Upgrade the itrezzo UCM server (Installer method)

By Harpreet Singh Wasu

If you are facing issues with the current version of your itrezzo UCM server or just want to upgrade, here is a step-by-step article.

1. Open a browser and go to http://support1.itrezzo.com/updates/server/.
    You can also double-click on the Download icon on the desktop of server running itrezzo UCM.

2. Click on the latest itrezzoAgentX.Y.Z..exe file. To identify if the current version of your server, look at the green bar the bottom of the web admin.

3. Click on the .exe file with the latest version number to download and Save it to a desired location.

4. Click on Start and type services.msc to open Services management console.

5. Stop these two itrezzo services:
  • itrezzo ECO Platform
  • itrezzoAgent Unified Contact Manager

6. You can leave the itrezzo ECO Watchdog alone. By default it's start up mode is Manual.

7. Once the itrezzoAgent.exe is downloaded, open File Explorer and navigate to the folder where you downloaded the setup file.

8. Double click on the itrezzoAgent.exe setup file > Click Install > Select Yes if prompted for User Account Control.

9. Once the Installation is successfully completed, click on Close on the itrezzoAgent Window.

10. Close all the File Explorer windows and the itrezzo update server web-page and return to  services.msc management console.

11. Start the two itrezzo services:
  • itrezzo ECO Platform
  • itrezzoAgent Unified Contact Manager
12. Double click on the Web Admin from the desktop to open the itrezzoECO Platform Admin Console.

You are all set and your itrezzo UCM software is up to date now ! 

If  you face any any issues while performing the steps above, reach out to our support staff.

How to Patch the itrezzo UCM server (copy and paste method)

By Harpreet Singh Wasu

If you are facing issues with the current version of your itrezzo UCM server, or just want to upgrade to the latest build, we have got you covered.

You can run the full installer. However, it takes a bit longer and we don't always release a full EXE install.  A patch is extremely quick to put in place and has a little less risk.

Here is a step-by-step article on How to Patch the itrezzo UCM server

Note: Patching using the File copy and paste method is only preferred when it you requested for a fix or a specific feature on demand to meet your organization requirements. 

1. Open a browser and go to http://support1.itrezzo.com/updates/server/

2. Go to Patch folder.

3. Look for the latest version with .zip file and Click on it to download and Save.

4. Click the Start menu and run services.msc to open Services management console. (Or open  the Run prompt by pressing Windows+ R key on the keyboard and type services.msc)

5. Stop these two itrezzo services:
  • itrezzo ECO Platform
  • itrezzoAgent Unified Contact Manager

6. You can skip the itrezzo ECO Watchdog service. By default it's start up mode is Manual.

7. Open File Explorer > C:\Program File (x86)\itrezzoAgent\ECOPlatform. Leave this window open and go back to the folder where you saved the patch file which we downloaded above.

8. Double click on the zipped folder and double click on the patch folder inside it to open it.

9. Using CTRL+A select all the files. Using CTRL+C, copy all the selected files and folders.

10. Switch back to the folder C:\Program File (x86)\itrezzoAgent\ECOPlatform and using CTRL+V paste all the contents inside this folder.

11. Select Replace the files in the destination  and click on Continue if prompted for Administrator permissions.

Note, if you dont get a message to replace files, you have probably pasted into the wrong location.

12. Close all the File Explorer and web browser page for the itrezzo support website. 

13. Return to the services app (already running from step 4). Start the two itrezzo services:
  • itrezzo ECO Platform
  • itrezzoAgent Unified Contact Manager

14. Double click on the Web Admin from the desktop to open the itrezzoECO Platform Admin Console.

If  you face any any issues while performing the steps above, reach out to our support staff for help.

Tuesday, October 16, 2018

Syncing Calendars and Contacts to Office 365 tenant with large number of mailboxes using CiraSync

By Harpreet Singh Wasu

If you are a CiraSync customer and have more than 1000 user mailboxes in Exchange Online, you will notice that when a sync task is run, five mailboxes get updated simultaneously. Normally, a single Service Account is configured for CiraSync and it can take over one day to update 1000 mailboxes.

This post will help you to take necessary steps to speed up the sync process using Multiple Service accounts.

Sample Calculations
We will use an example where it takes five minutes to update an individual mailbox. If five mailboxes are updated at once, that means a mailbox is being synced almost once every one minute.

With that speed, CiraSync can update 600 mailboxes in 10 hours (Ten hours = 600 minutes) or 20 hours to update 1200 mailboxes.

If you are syncing a huge contact list to user mailboxes, it may even take 10 minutes to update a single mailbox. With five parallel updates, that would mean completing a sync once every two minutes.

What would happen if your tenant had 3000 licensed CiraSync users getting synced at the rate of 10 minutes per mailbox ?

For 3000 users getting synced at 10 minutes per mailbox, a rough calculation is that it takes 30,000 minutes (i.e. 500 hours). With Five threads (simultaneous updates) using one Service Account, the sync task will take about 100 hours or about 4 days to complete.

So, how can I speed this up?

By configuring CiraSync with Multiple Service accounts, you increase the number of parallel tasks in  multiples of five.

This simply means one Service Account is able to run Five EWS threads at the same time.  Thus, if you have four service accounts, a synchronization task will be able to run 20 threads at once.

Each thread updates one mailbox so you can have 20 simultaneous mailbox updates at one time.

Using the examples above, this could reduce the overall time of completion from 4 days to just one day.

Setting up a CiraSync tenant to be able to use Multiple Service accounts

The multiple service account feature is not enabled by default.

To enable your CiraSync tenant for multiple service accounts with Office 365, create a support request for this feature by sending an email to support at cirasync.com. 

You may already have a dedicated service account for CiraSync. Now you will need to create one or more Service Accounts for CiraSync.

To do this, follow the below steps. After each service account is created, you will use it to login to the CiraSync dashboard and grant consent to the CiraSync Azure Application and acquire token.

Each new service account will need the role of  'Application Impersonation' and Global Administrator. However, after the fist login, you can change the service account from Global Administrator to Service Administrator in Office 365.

Here is a step by step guide for it.

1. Login to your Office 365 portal as a Global Administrator and Navigate to Office 365 Admin Center by clicking on Admin.


2. Click on Users > Active Users


3. Click on Add a User. Fill in the required details - First Name, Display Name. We recommend you use a consistent service account Display name to identify each account.

Set a strong Password and make it a Global Administrator. If  you are syncing Public Folders, assign a License to the Service Account - any License that will have an Exchange Online plan is needed so a mailbox is created for the Service Account.


4. Once the new account is created, use a different browser. or use an IR/Edge In-Private window. In Google Chrome, use an Incognito window and navigate to https://dashboard.cirasync.com.

Login to the portal with the newly created Service Account.


5. In the screen snapshot shown below, you are initially entering as a Personal Edition User. You will need to click on Upgrade to Enterprise Edition to sign-in as Enterprise Edition user.


6. Give your consent by allowing the CiraSync to access your tenant using the new service account. At the prompt shown below, Permissions requested Accept for organization, click Accept.


7. Make this new identity a Service account in CiraSync. On the upper right corner, click on the username you are signed-in with and select Settings.


8. From the navigation pane on the left, select Service Account option as shown below.


9. Here you can view all the accounts from Office 365 that have been used to sign-in to CiraSync dashboard or have been added to be used as Service Account for CiraSync.


Check the boxes next to all the accounts you want to use as Service Account for CiraSync and click on Save.


10. Once you choose the Service accounts for Cirasync and Save the changes the screen will show you the selected service accounts and the Save button will show grayed out.


After you the service account is locked successfully, logout from CiraSync dashboard portal.

Following the above steps, you can add and lock multiple service accounts for CiraSync. Once you lock the required number of service accounts for CiraSync, you can change the role of these service accounts from Global Administrator to Service Administrator in Office 365.

Follow the below steps for it:

11. Login to your Office 365 portal as a Global Administrator and Navigate to Office 365 Admin Center by clicking on Admin.


12. Click on Users > Active Users


13. Select the account that has to be changed from Global Admin to Service Admin. Click on Edit next to Roles.


14. Click on Customized Administrator radio button and then check mark the box next to Service Administrator and click on Save.


Now that you have locked the Service accounts for CiraSync, don't forget to give Application Impersonation role to these service account.

For step by step instructions, check out our blog post for How to Set Impersonation Mode for GAL or Public Folder Sync to User Mailboxes

If you have any questions or feedback regarding this process and working, feel free to reach our excellent customer support team at support@cirasync.com

Wednesday, September 5, 2018

How to Set Impersonation Mode (Application Impersonation) for GAL or Public Folder Sync to User Mailboxes

By Harpreet Singh Wasu

There are two types of permissions that you can give to a service account for GAL or Public Folder Sync to User Mailboxes.

The first way you can give the permissions is by Delegation and second is by Impersonation.

This Blog Post shows how to setup the Service Account for Impersonation mode in Office 365 (Exchange Online).

If your organization is Cloud-Only (All mailboxes are in Office 365)  you should use the below steps to grant Application Impersonation role to your mailbox.

If you are looking to find the steps to give the permissions using mailbox Delegation, navigate to Exchange Service Account Permissions and itrezzo Contact Management

How to setup App Impersonation for Office 365 and Exchange 2013/2016 


1. Log in to your Office 365 portal as a Global Administrator and Navigate to Office 365 Admin Center by clicking on Admin.


2. From the Office 365 Admin Center, expand the navigation bar on the left side and scroll to the bottom and expand Admin and then click on Exchange. You can also navigate to Exchange Admin Centre (EAC) through https://outlook.office365.com/ecp/


3. From the EAC, either Click on Permissions on the left-hand navigation and make sure you are under Admin Roles Tab at the top or Click on Admin Roles below Permissions on the Home page of EAC


4. Check if you already have a Role Group created with Application Impersonation Role. If not, create a New Role Group by clicking on the + sign.


5. In the New Role Group window, give a name for this New Role Group. For easy to remember, you can name is App Impersonation. Give any description of your choice in the Description Box. Click + on Roles. Select Application Impersonation and Click Add and OK.


6. Now Click on + sign below the Members, add the Service Account as the Member of this Role Group, click on Add and OK.


7. Once it’s done, click on Save in the New Role Group Window.


It can sometimes take several minutes (generally 30-60 minutes) or these changes to become active and get replicated across all the directories.


If you would like to enable App Impersonation via PowerShell, read the blog post How to Configure an Office 365 Hybrid Premise Service Account.

Want to Learn how and when to use impersonation in your Exchange Server or Exchange Online environment, check out Impersonation and EWS in Exchange

You can also refer to the Microsoft Article on How to Configure Application Impersonation using PowerShell.


Tuesday, April 10, 2018

How to create Dynamic DL's in Azure Active Directory


Vern Weitzman


Using On premise Exchange and Active Directory, almost any LDAP query can be turned into a Dynamic Distribution List.

Ironically, Active Directory on Azure has lobotimized LDAP. A very good substitute is available with Azure AD Premium.

If you are using itrezzo UCM, this post has a pretty good set of instructions on how to create a Dynamic Group for Office 365 usage.

The final step shows you how to create a contact collection. If you are a UCM user, you will want to finalize the process with an ECO Collection.


Tuesday, March 13, 2018

One Exchange Calendar synced between two different Exchange Servers


By Vern Weitzman

A Microsoft partner asked us for a specific Outlook calendar solution for an executive. The exec moved up the ranks to work part time at the HQ for a multinational conglomerate.  For the foreseeable future, she was going to be using a mailbox at both Organizations.

Her calendar was a different story.  Three people were going to continue managing her calendar. However, dozens needed view access at both organizations.

When there is literally a team of assistants that manage your calendar, It is likely filled for 12 months in advance with a full days schedule.  There are thousands of appointments and dozens of changes each day.

We have recently added an Outlook Calendar connector that can reach into remote Exchange Servers.  You create this like you create an ordinary Calendar Distribution List except that the source lives in a different Exchange Organization.


Create Remote Calendar Distribution List


Once you choose the Remote Exchange Calendar, you will be able to define the remote Exchange Server.


Note that the remote organization can be Exchange on-premise, or even an Office 365 tenant.

For more assistance, please contact itrezzo Support.


Monday, March 5, 2018

How to share contacts from two different Exchange Orgs


By Vern Weitzman

If you have ever had to share contacts from two different Exchange organizations on short notice, you might have tried something from the Exchange Managers handbook: Bi-nodal interorg PST transplant surgery .

Yes. I did just make that up.  My apologies if you started googling for the Exchange Managers Handbook.

However on many occasions I have worked with email administrators that have performed this annoying procedure. They export contacts to a PST. Email a zip file to a subsidiary.  Get told that it’s empty and have to repeat it again. You can email the zip file until Outlook is closed and you can send an email with Outlook closed. 

On the other side where it’s even more painful. It is a slow and boring procedure to open mailboxes, drag and drop contacts.

If you have to share contacts both ways, it’s twice as miserable. It is painful enough that it rarely gets done and the contact information gets stale quickly. When you want to do a refresh, you have to wipe everything out and start over. Just deleting several hundred contacts from a mailbox can take quite a few minutes. It also causes quite a bit of exchange server traffic as well smartphone resync traffic.

With itrezzo Unified Contact Management, you can easily automate this procedure. Updates are done automatically and as often as you like. Incremental changes at the source are incremental at the target, so it’s quick and band with efficient. If you are a CiraSync user, there is something similar with Global Address List sync between two different tenants. Learn how to perform this procedure on CiraSync!
How to Share Outlook Contacts between two Orgs
In itrezzo UCM, there are two constructs for pushing contacts:

  • MCL’s - Mandatory Contacts Lists
  • CCL’s - Custom Contact Lists
If you are pushing contacts from the Global Address List, an MCL is the best method.  With an MCL, you can use mail enabled groups from from Active Directory to select the members of the  contact list you want to sync to your users.  If a user already has a contact for a coworker,  UCM will update that contact and start managing it as part of the contact list.  It’s the best way to avoid duplicate contacts.

However in the example described at the top of the post, the contacts from the remote HQ GAL are presumably not in the local GAL. Thus, the prescription here is for a CCL.

A CCL can be used in almost all other cases. You can sync Outlook contacts from public folders, mailboxes, a SQL database or even a CSV. The final option (which we will use in this example) is to connect to Public Folder or mailbox contacts on a remote Exchange server.

To sync a public folder from our parent organization, we will create a Custom Contact List as shown below.

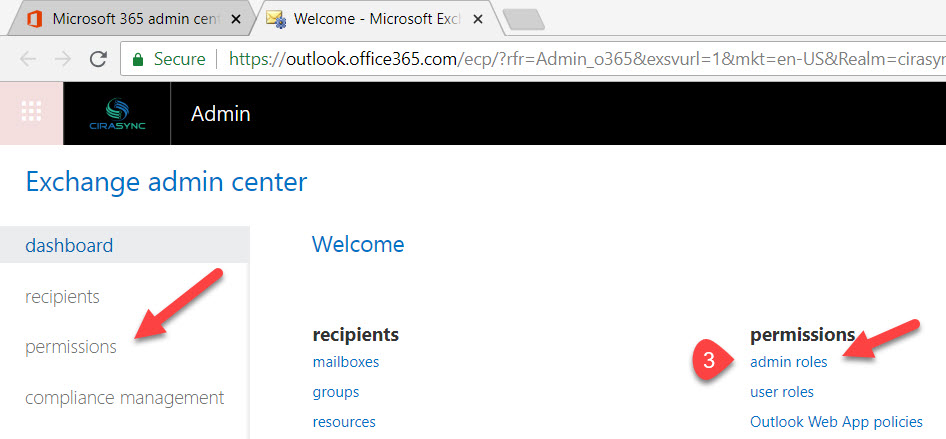
Navigate to the Unified Contact Manager container. Now select Custom Contact Lists. In the top right corner on the black and white toolbar, choose From Remote Exchange...  

choosing a contact source for an Outlook contact folder


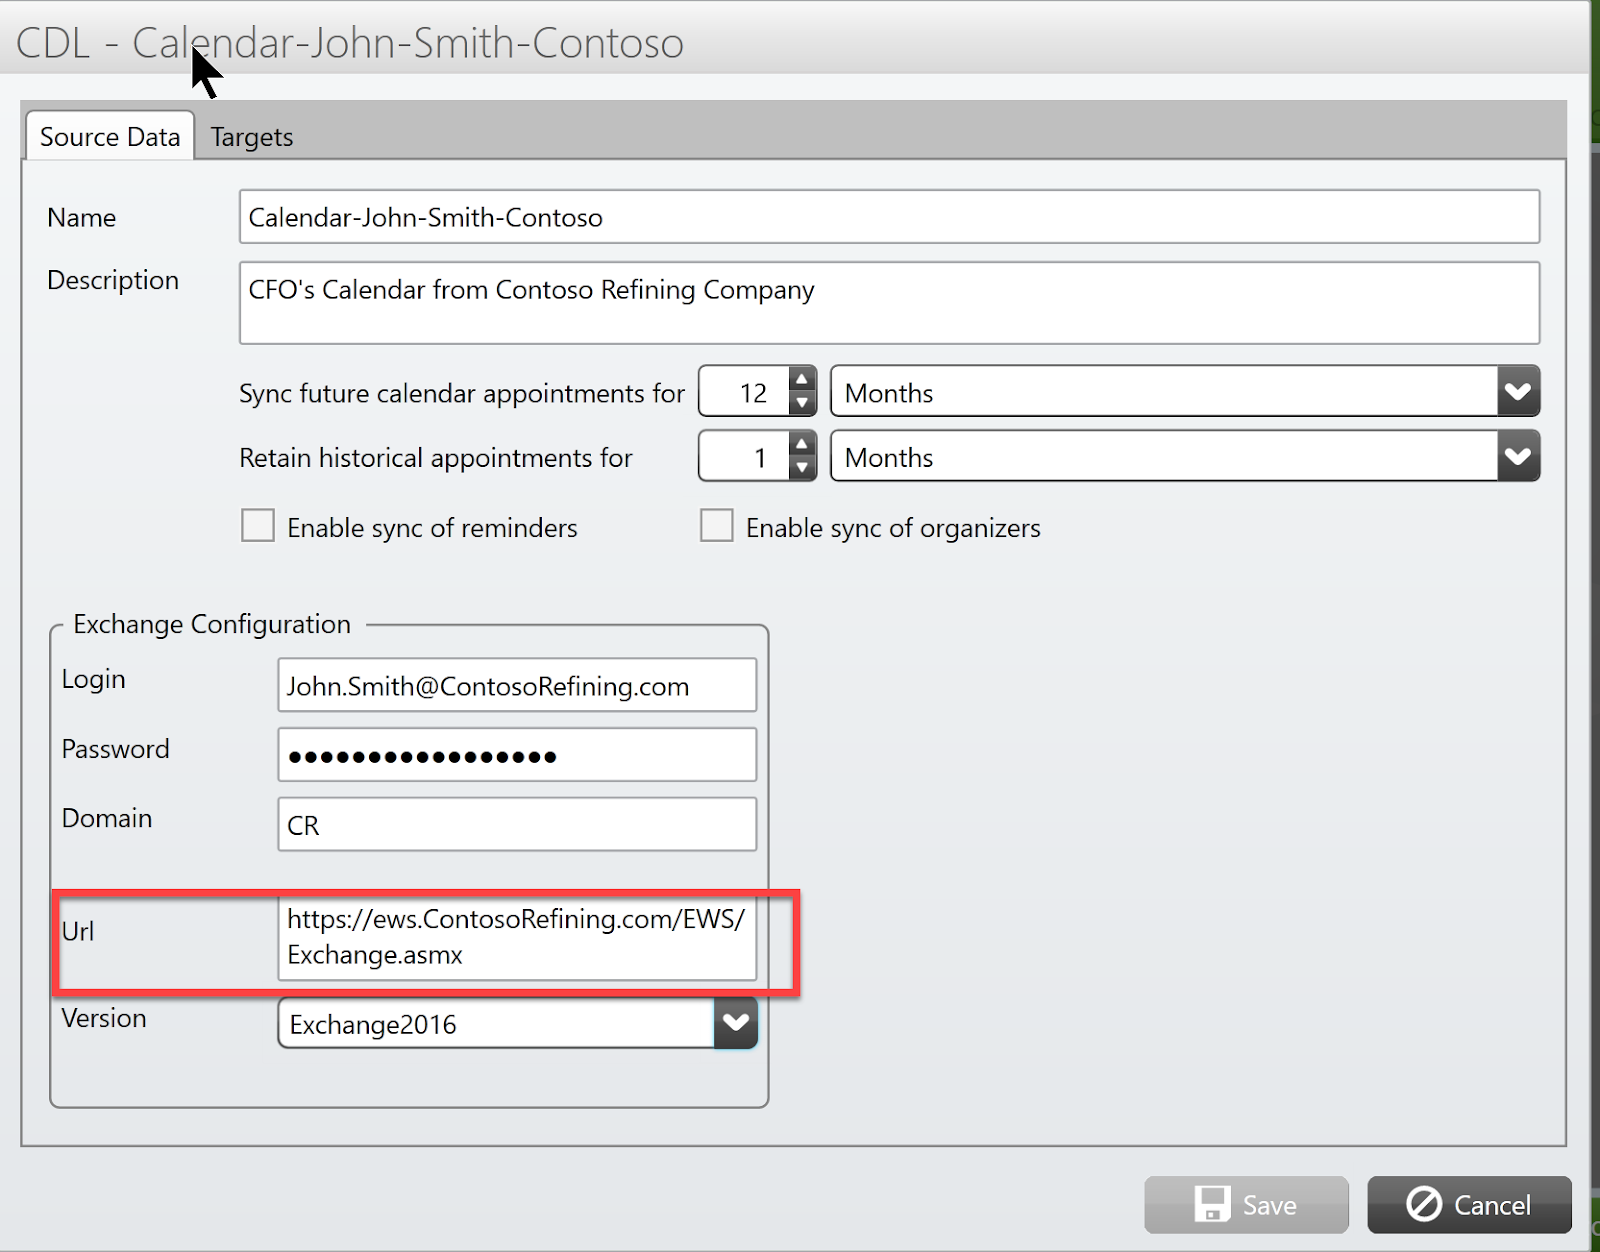
The Remote Exchange Dialog box is displayed:
Choose Mailbox or Public Folder. Than select your contact folder


We start by entering the name of the contact list (1). This name is used as a category on each target contact so want to keep the name precise and short.

The username (2) on the remote system does NOT need to have any particular domain or Exchange Server permissions. It is an ordinary mailbox that has REVIEWER permission on the source public folder.  In that way, the parent HQ doesn’t need to create a privileged account for use outside of their immediate IT organization.

In almost all cases, EWS (Exchange Web Services) is exposed at the same URL as OWA. We will need to put the fully qualified URL (3) with the suffix /EWS/Exchange.ASMX.

Next we select Public Folder (4) at the bottom.  If our credentials and URL endpoint are correct, we see the public folder hierarchy in the remote organization.  Now we navigate to the desired public folder and select it.

Next click on the Targets tab (7) and you will see the dialog as shown below.

Setup the target contact folder in Outlook

I typically recommend using a subfolder for external contacts (8).  All of the target users have iPhones and they will sync contact subfolders from their Exchange Mailbox.

A subfolder (9) will automatically be created in every target mailbox. Again, it is important to use a very precise name (9). Users will see this folder on both their desktop and smartphone.

We always recommend adding a category (10)  to each target contact. This makes it easier for users to see the contacts as a group.

The last and final step is to choose the target users (11) that will receive the contacts from the remote Exchange Server. We recommend that you use a collection to configure the targets.

Save the CCL and we now see contacts from remote Exchange Server in the grid.


We will also license all of the target users.

For a quick test, we will navigate to the User Statistics container and run UCM on a single user. After that completes, there will be a NY HQ subfolder in that user’s mailbox.

On the next scheduled UCM Task, all users will get the NY HQ contacts.